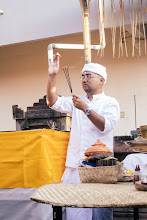
Subscribe

RSS Feed (xml)

Powered By

Skin Design:
Free Blogger Skins

Powered by Blogger

Wednesday, March 26, 2008

Simple mystical effect on your photo by rick gondrong

Step 1.
Fix your original photo histogram by using image adjustment level and curve
hb_asli.jpg

Step 2.

Use Unsharp Mask tools to more sharpen your photo, if your photo not to sharp.
In this photo, i used the amount 100 and radius 1px

Step 3.

Create duplicate layer from background and rename as cloud, then use filter-render-clouds to create smoke effect to the photo

Step 4.
Coloring the smoke with yellow to give warm effect to the smoke, I used color balance on image adjustment on this step
hb_cloud.jpg

Step 5.
Change the Cloud layer Opacity to 81% and Fill to 51%

Step 6.
Use your creativity in deleting some smoke area on your photo
hb_cloud_edit.jpg

Step 7.
Create enother duplicate layer from background and name it Blur. Then use filter-blur-gaussian blur with 50px
hb_blur.jpg

Step 8.

Change the blending option of Blur layer to Hard light. This will give more contrast light to your photo
hb_jadi.jpg

Finish

tips by rick gondrong

Saturday, March 22, 2008

Canon 5D Mark II will coming soon!

The new 5D II will not be released at Photokina, but instead will be a surprise announcement on April 22, according to a source I am unwilling to disclose.
The specs of the new camera are as follows (final name unavailable):

- 15.3 MP full frame CMOS sensor (vastly improved light-gathering capacity per pixel: improved micro lenses; miniaturized micro circuitry; enhanced signal/noise ratio)
- Weather sealing same as 1Ds Mark III
- Dual Digic III with all-new “CXR” NR system reported to best 3rd party NR software. Available as a C.F with 4 levels of customizable parameters.
- 14 bit A/D conversion
- ISO 12800 (C.F. up to 25600)
- Reported 1 2/3 stop sensitivity improvement
- All-new 29-point TTL CMOS sensor with 12 cross-type for F/2.8 or faster lens 35% faster than 40D)
- Micro lens fine adjustment for up to 14 lenses
- 300,000 exposure shutter durability
- 6.0 / 3.0 fps
- 3.0″ LCD
- 922,000 pixels
- EOS Integrated Cleaning System
- Live View (improved from 450D; latest generation)
- 6/3 fps continuous shooting for up to 68 frames
- MSRP $3499, available June 2

via dpreview forum

Sunday, March 16, 2008

Composition tips: Rule of thirds by Rick Gondrong

The basic principle behind the rule of thirds is to imagine breaking an image down into thirds (both horizontally and vertically) so that you have 9 parts. As follows.


As you’re taking an image you would have done this in your mind through your viewfinder or in LCD display that you use to frame your shot. With this grid in mind the ‘rule of thirds’ now identifies four important parts of the image that you should consider placing points of interest in as you frame your image.

Not only this - but it also gives you four ‘lines’ that are also useful positions for elements in your photo.

The theory is that if you place points of interest in the intersections or along the lines that your photo becomes more balanced and will enable a viewer of the image to interact with it more naturally. Studies have shown that when viewing images that people’s eyes usually go to one of the intersection points most naturally rather than the center of the shot - using the rule of thirds works with this natural way of viewing an image rather than working against it.

Using the Rule of Thirds comes naturally to some photographers but for many of us takes a little time and practice for it to become second nature.

In learning how to use the rule of thirds (and then to break it) the most important questions to be asking of yourself are:

* What are the points of interest in this shot?
* Where am I intentionally placing them?

Once again - remember that breaking the rule can result in some striking shots - so once you’ve learnt it experiment with purposely breaking it to see what you discover.

Lastly - keep the rule of thirds in mind as you edit your photos later on. Post production editing tools today have good tools for cropping and reframing images so that they fit within the rules. Experiment with some of your old shots to see what impact it might have on your photos.

tips by rick gondrong